Install WordPress
WordPress can be installed on your Trinity Domains site through cPanel, the dashboard used to manage your web space.
At Trinity, WordPress installations are managed through a tool called Installatron. Installatron allows you to install, update, back up, and manage web applications such as WordPress.
Before You Begin
Before installing WordPress, make sure you have already claimed your Trinity Domains site.
Your Trinity Domains address will usually look something like:
yourname.domains.trincoll.edu
You will also need to log in using your Trinity username and password.
Step 1: Log In to Trinity Domains
Go to Trinity Domains, select Dashboard, and log in with your Trinity credentials.
After logging in, you will be taken to cPanel. This is the main dashboard for managing your domain.
cPanel includes many tools, but for installing WordPress, you will mainly use the Applications section.
Step 2: Find the WordPress Application
In cPanel, look for the Applications section.

Click the WordPress icon to begin installing a new WordPress site.
Be careful not to confuse this with My Apps. The WordPress icon starts a new installation. My Apps is where you go later to manage WordPress sites or other applications that have already been installed.
Step 3: Start the Installation
After selecting WordPress, Installatron will open.
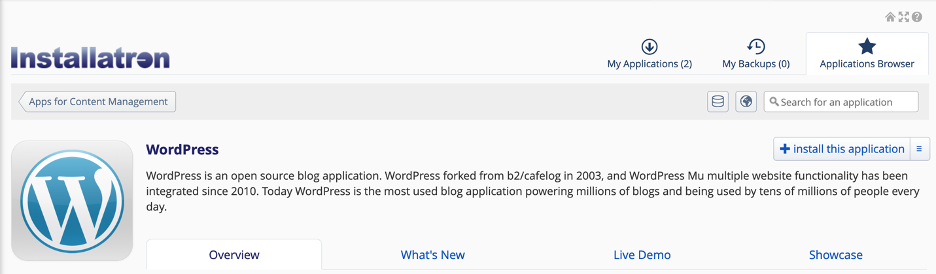
Click Install this application to begin setting up WordPress.
You will then see a settings page where you can review and adjust details for the new WordPress site.
Step 4: Choose the Installation Location
In the installation settings, choose where WordPress should be installed.
Pay close attention to the Domain or Location field. If you have more than one domain or subdomain, make sure you select the correct one.
When possible, choose the version of your site that begins with:
https://
Using HTTPS helps keep the connection to your site secure and prevents browser security warnings for visitors.
Step 5: Review the Settings
In most cases, you can leave the default installation settings as they are.
However, you may want to review the following fields:
- Website Title
This is the name of your WordPress site. You can usually change it later.
- Website Tagline
This is a short description of the site. Some themes display the tagline, while others do not.
- Updates and Backups
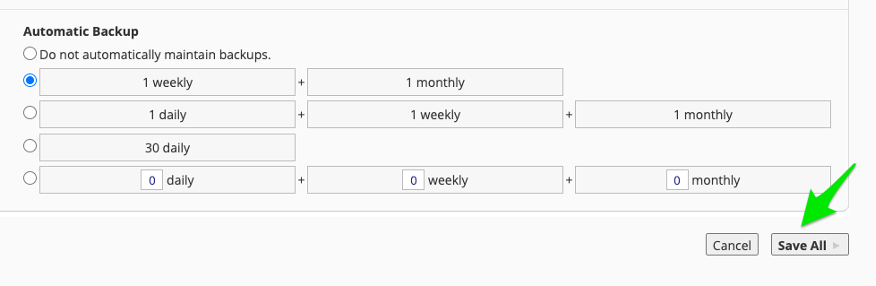
If options are available for automatic updates or backups, review them carefully. Within the Automatic Backup section, choose the frequency that would work best for your site. For example, if you edit your site daily, you would want to make sure you include a daily backup. Alternatively, if you work in your site infrequently a monthly backup schedule would work fine. We recommend 1 weekly and 1 monthly backup. After you have selected your backup schedule, click ‘Save All’ in the bottom right.
Check out this article for more on backing up your WordPress.
Step 6: Install WordPress
Once you have reviewed the settings, click Install.
Installatron will begin installing WordPress. This may take a few moments.
When the installation is complete, you should see your new WordPress application listed in Installatron.
Step 7: Open the WordPress Dashboard
To edit your new WordPress site, click the login button.
This takes you to the WordPress Dashboard, where you can begin creating pages, writing posts, uploading media, choosing themes, and managing site settings.
After Installation: Check HTTPS
After installing WordPress, confirm that your site is using HTTPS.
Trinity’s documentation notes that some WordPress installations may also need the site address checked from inside WordPress.
To check this in WordPress:
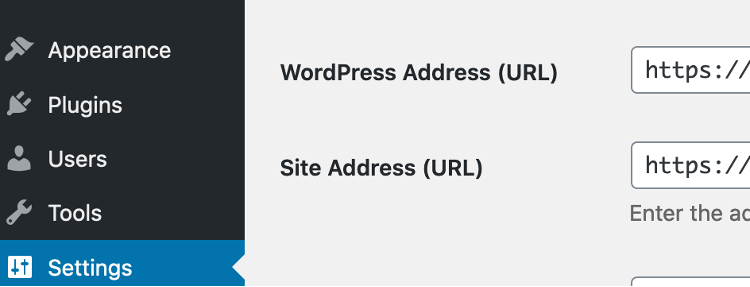
- Open the WordPress Dashboard.
- Go to Settings.
- Select General.
- Look for WordPress Address (URL) and Site Address (URL).
- If either address begins with http://, change it to https://.
- Save your changes.
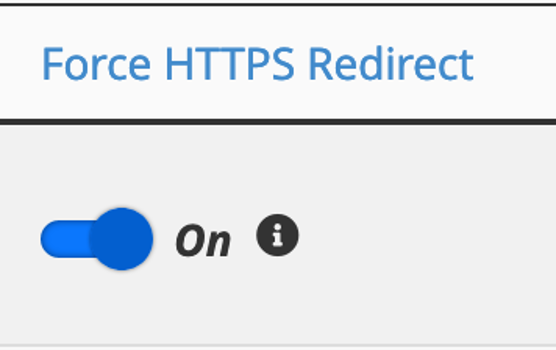
You may also need to make sure Force HTTPS Redirect is turned on in the Domains area of cPanel.